Setting up the Server
After creating a droplet using the infrastructure cloud provider DigitalOcean, I followed their tutorial for setting up the droplet. I also added two utilities that I like to use an any Linux box — vnStat and Glances. vnStat helps keep track of network usage over various periods of time. Glances displays system resources/usage.
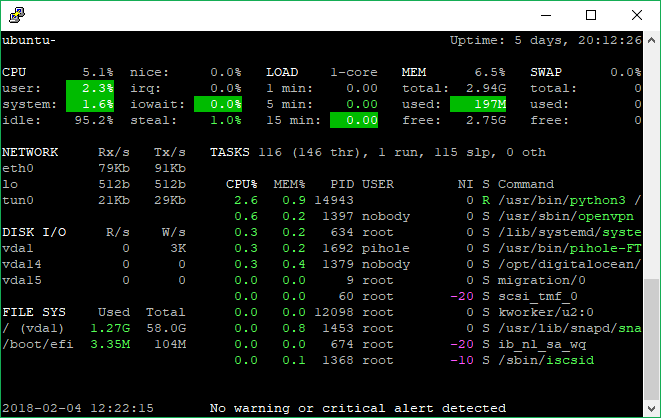
Screenshot of the glances application running on Ubuntu 16.04

Screenshot of the vnStat application running on Ubuntu 16.04
The droplet size I chose was a 3 GB/1 CPU for $15/month ($0.022/hr) however DigitalOcean offers a 2 GB/2 CPU and a 1 GB/3 CPU droplet for the same cost. I will try to closely monitor my CPU and RAM usage to see if switching over to the 2 GB/2 CPU configuration is needed or not. DigitalOcean has some good monitoring tools that I can use to set up alerts on such things as CPU, RAM, bandwidth usage (upstream and downstream), and disk usage in case any of these resources passes a certain threshold for a period of time.
OpenVPN Install
To install OpenVPN, there is a lovely script someone has created that takes care of everything for you. It is available here. I ran the script as the root user and the script asked for a few inputs — I just used the recommended defaults — and it takes about a minute to install. From there, I went to step 12 of the DigitalOcean guide. From here, all that I needed to do was download the Windows OpenVPN application/service and I was almost done! I then just needed to download the *.ovpn file that was created from running the above script into the ‘C:\Program Files\OpenVPN\config’ folder, and I’m literally one step away from using the service.
A quick note, I had to down my *.opvn file into another folder and then copy it to ‘C:\Program Files\OpenVPN\config’ folder as an Administrator as FileZilla wouldn’t let me complete the download for some reason. It is likely due to a security setting and inability of FileZilla not being able to run as an Admin user.
![]()
Once the profile was saved to the config folder, I right clicked the icon with the computer monitor with the lock (highlighted above) and clicked ‘Connect’. A status window briefly appeared and then I was connected to my VPN server! To confirm traffic was being routed through the VPN server, I went to a site like IP Location Finder. The site should return the IP address of my VPN server and not the address ISP assigned for my home network connection.
I discovered after trying to connect more than one device to the VPN Server with the same profile, that each device needs its own profile. To create more than one profile, all that needs to be done is rerun the script if these profiles weren’t created as part of the initial set-up:
wget https://git.io/vpn -O openvpn-install.sh && bash openvpn-install.sh
Pi-hole Install
At this point, I am ready to install the Pi-hole server as outlined here. The install was simple and only took a few minutes. The directions provided in the guide is very straightforward and easy to follow.
After fully implementing everything, the bandwidth through the VPN tunnel is more than sufficient for what I need. I clocked a download for an iTunes application update at around 60 MB/s, which pegged the CPU between 30 and 40% utilization.
After confirming everything was working like I wanted, I powered down my droplet so that I could take a backup just in case anything were to go wrong going forward. Should a major problem occur, I will now have a restore point and the only thing I will lose is statistical data and possibly a few blacklist or whitelist settings made within Pi-hole. I plan to take quarterly backups of my droplet so that I will have regular backups to restore from should anything go awry. I would recommend everyone to take such precautions.
Overall, the install took perhaps an hour or less. I didn’t encounter any issues and anyone who follows this process has the ability to go back and rerun any of the above scripts should you decide to change any settings made from the initial install.
I will be closely monitoring the usage and performance of my VPN server/ tunnel, and PI-hole system for about a month. I will post a new article with some graphs to highlight server performance and various PI-hole statistics.